Prefabricated Interior Fit-Out: This One Article Covers It All
WeChat Sync · Xiaowei · 2023-09-10
This article is reposted from the WeChat public account Xinzhu Classroom, for learning and exchange purposes only. The copyright belongs to the original author.

In recent years, in the architectural decoration industry, the topics and formats surrounding prefabricated interior fit-out have been booming, but actual end users in the consumer market still know very little about it, and the traditional decoration industry has continued to present a competitive landscape of "big industry, small companies".
Many peers may think that prefabrication simply means splitting modules, assembling and joining, and so on. Although this understanding is not wrong, it is still very narrow and one-sided.
This article on prefabricated interior fit-out will elaborate from the following seven aspects:
I. What is prefabricated interior fit-out
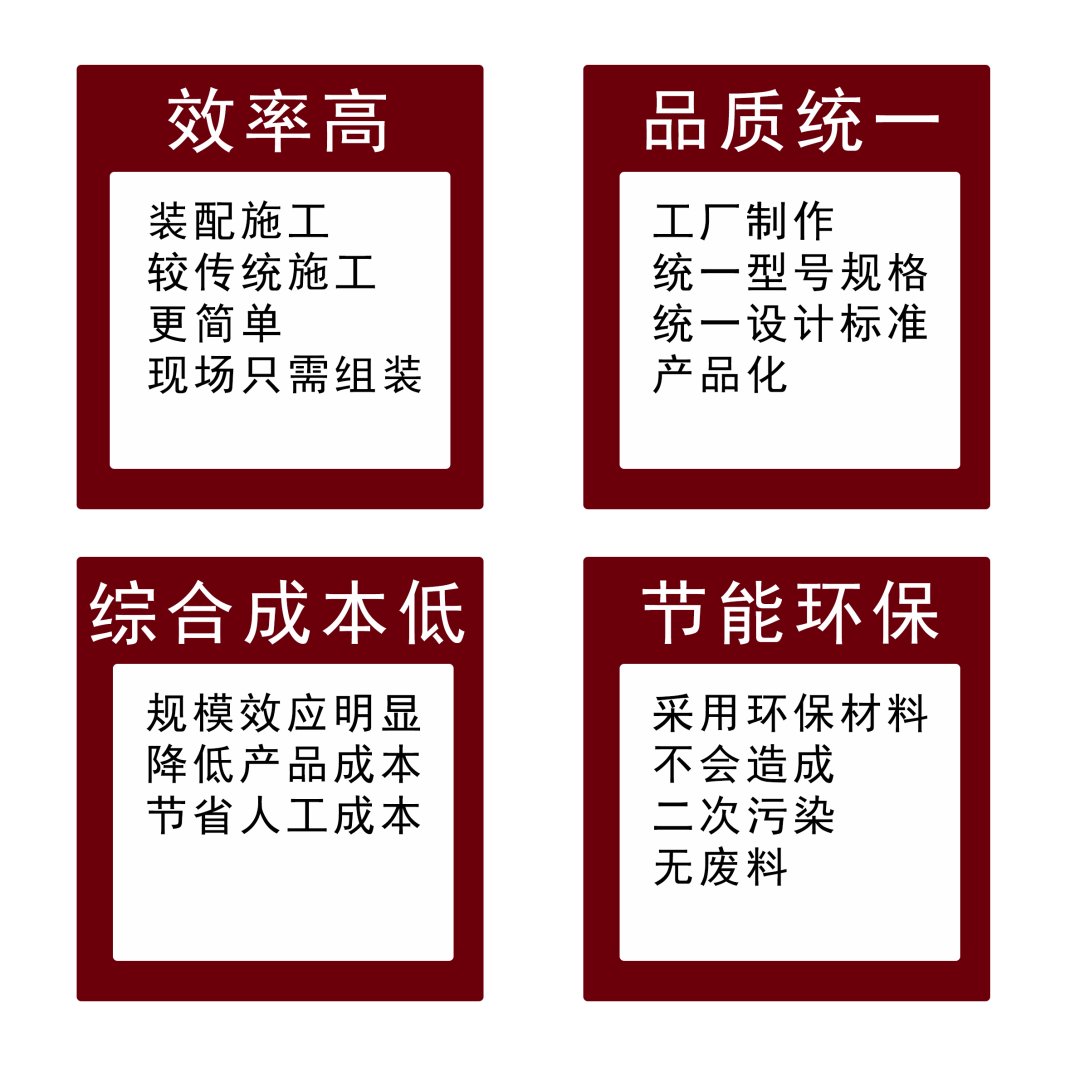
II. Application advantages of prefabricated interior fit-out
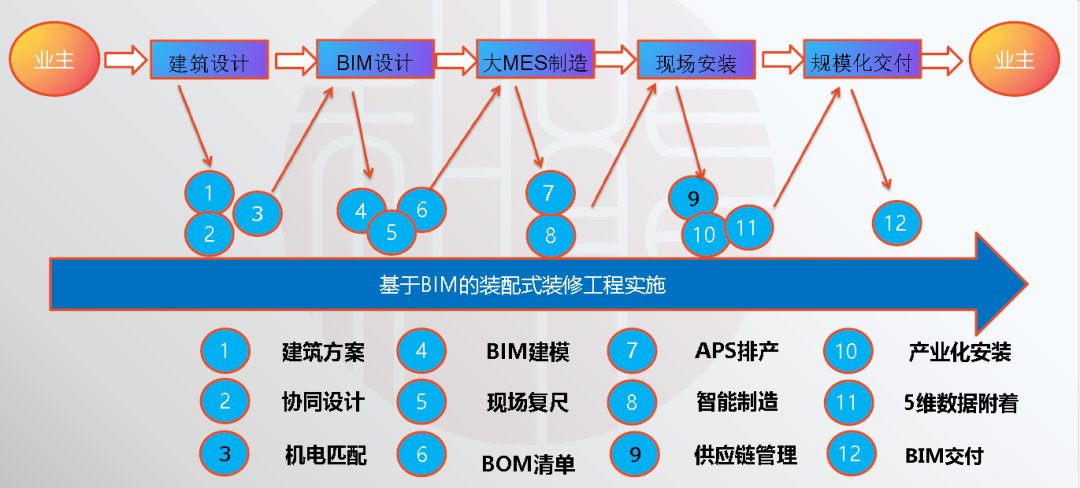
III. Prefabricated interior fit-out procedures
IV. Technical foundations of prefabricated interior fit-out
V. Construction methods of prefabricated interior fit-out(1 Quick-install lightweight partition wall method / 2 Drainage branch pipe installation / 3 Waterproof dam installation / 4 Electrical box installation / 5 Water supply pipeline installation / 6 Rock wool and waterproof membrane installation / 7 Coated panel installation / 8 Shower base installation / 9 Kitchen and bathroom ceiling installation / 10 Modular block heating floor method / 11 Wooden keel installation / 12 Floor heating module installation / 13 Baseboard component structure installation / 14 Floor heating pipe laying / 15 Floor coated panel installation)
VI. Characteristics of prefabricated interior fit-out projects
VII. Comparison between prefabricated and traditional interior fit-out
I. What is prefabricated interior fit-out?
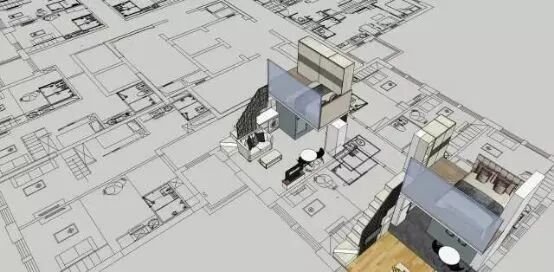
Prefabricated interior fit-out is like building with LEGO bricks. The interior fit-out materials for the whole house are divided into standardized modules, units and components, and combined piece by piece, so that a complete space can be built, whereas traditional interior fit-out may require starting from making every single brick yourself.

It means that, at the factory, the three surfaces are first prefabricated—the ceiling panels, wall panels, and floor base and surface layers—along with the required specialized assembly parts; the finished products are then transported to the construction site, where dry construction methods are used to assemble them into place.
Standard definition per industry codes: Prefabricated interior fit-out refers to a fit-out method that uses dry construction methods to assemble and install factory-produced materials at the fit-out site.
(Dry construction methods are water-free construction approaches that achieve the separation of pipelines from the main structure through an elevated design. Dry construction methods can keep the construction site clean and accelerate subsequent construction.)
II. Application advantages of prefabricated interior fit-out
III. Prefabricated interior fit-out procedures
IV. Technical foundations of prefabricated interior fit-out
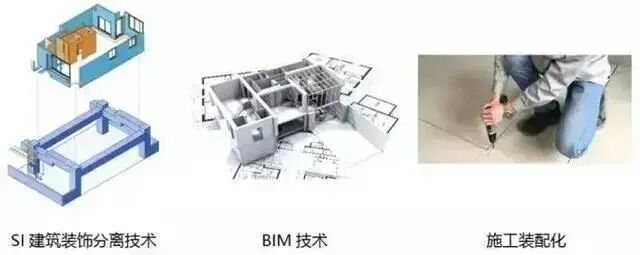
The three major technical foundations of prefabricated interior fit-out are SI (Skeleton-Infill) separation technology, dry construction technology, and on-site prefabricated construction technology.
1. SI separation technology: that is, the load-bearing structural skeleton (Skeleton) of the building is separated from the internal space (Infill). The building structure is fixed and determined through calculation, while the internal space design is variable and decided by the building users;
2. BIM technology: that is, building informatization management technology, which refers to entering data such as floor plans into the system, carrying out digital information simulation of the real information possessed by the building, and realizing functions such as project supervision and property management through a three-dimensional building model;
3. Construction prefabrication: this refers to producing parts and components in the factory, with on-site work consisting mainly of assembly that can be completed with only simple tools and steps, and virtually zero cutting during on-site construction.
V. Construction methods of prefabricated interior fit-out
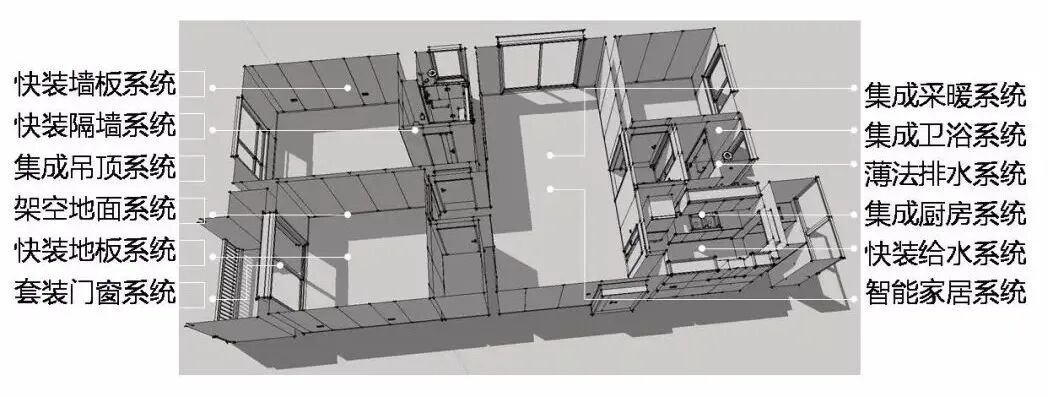
The ten major systems of prefabricated construction △
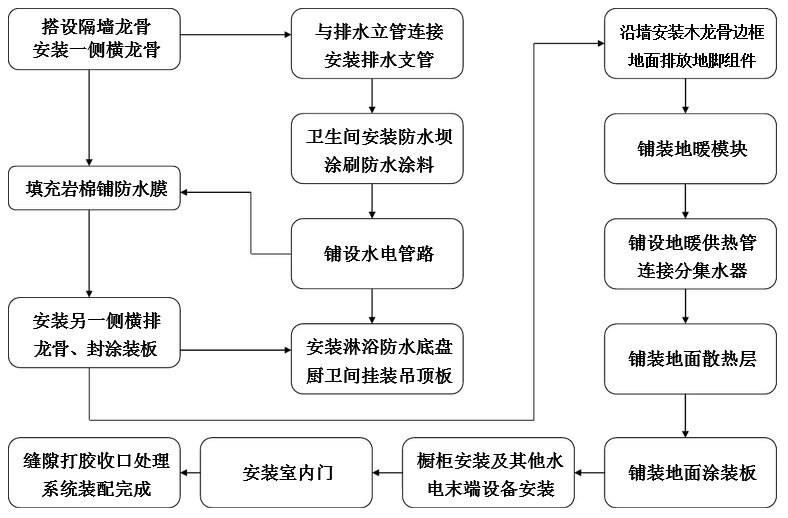
Flowchart of prefabricated interior fit-out construction △
1. Quick-install lightweight partition wall method
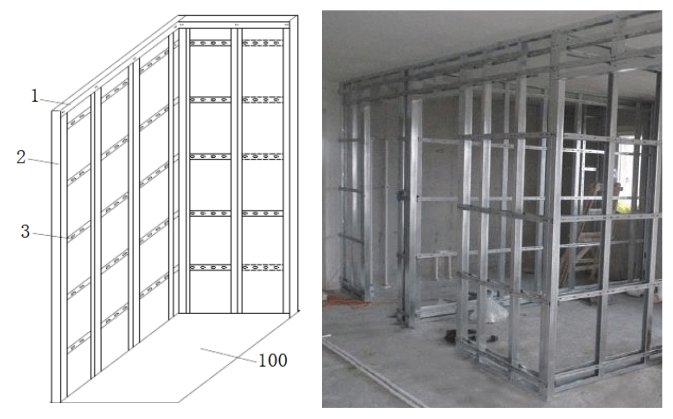
Schematic and on-site photos of keel frame installation △
1 Top and bottom keel 2 Vertical keel 3 Horizontal keel 100 Structural base layer
1. According to the design scheme, mark the width line of the partition wall along the ceiling and floor;
2. Fix the top and bottom keels and the frame keels according to the marked lines, bonding them with a full application of structural adhesive and securing them with expansion screws; the fixing points are 20mm from the ends of the top and bottom keels and spaced 400mm apart in between;
3. Install the vertical keels in the grooves of the top and bottom keels at a spacing of 400mm; use double rows of vertical keels at door and window openings to enhance strength;
4. Install the horizontal keels on one side: the first row of horizontal keels is 300mm from the ceiling, the third row is 1360mm from the floor, the fifth row is 300mm from the floor, and the remaining two rows are evenly spaced;
5. Reinforce the positions where the air conditioner and TV are to be installed with blockboard coated with fire-resistant paint on the surface.
2. Drainage branch pipe installation
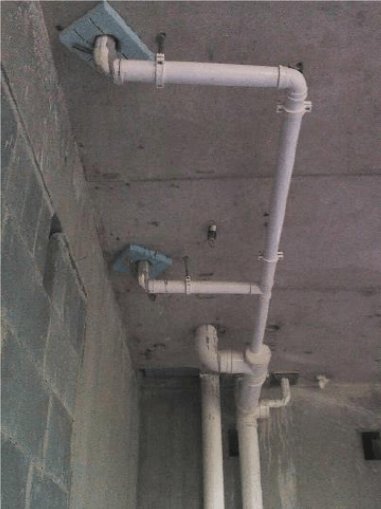
On-site photo of drainage branch pipe installation △
1. Connect the drainage branch pipe to the reserved drainage riser opening; the horizontal branch pipe is suspended by hangers within the lower ceiling;
2. When the drainage branch pipe turns upward and passes through the waterproof layer, the waterproof layer must be rolled up around the pipe root and tightly wrapped to prevent leakage at the pipe root;
3. The slope of the drainage pipes and the installation spacing of the hangers shall comply with the relevant regulations.
Note: The floor drain pipe uses a PVC50 pipe, and the toilet drain pipe uses a PVC110 pipe
3. Waterproof dam installation
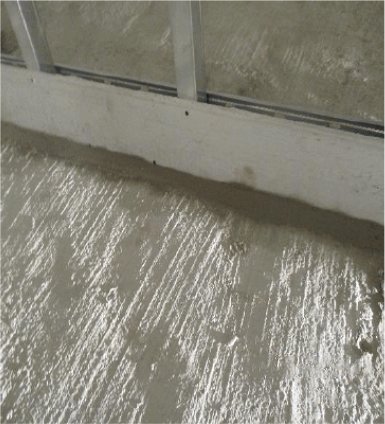
On-site photo of waterproof dam installation △
1. Install a 300mm-high waterproof dam along the newly built partition wall of the bathroom;
2. At the junction between the waterproof dam and the structural floor, use cement mortar to form a chamfered fillet;
3. Apply the first coat of film-forming waterproof coating on the structural wall surface, floor surface and waterproof dam surface, with a thickness reaching 1.5mm;
Note: The waterproof dam uses 8mm-thick calcium silicate board, and the waterproof coating uses the JS-II type
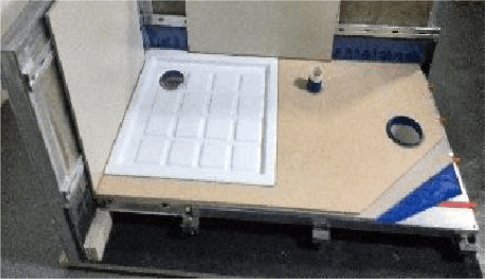
4. An integral waterproof layer made of PVC material is laid on the upper layer of the floor heating module to form a second waterproof layer. At the riser pipes passing through the waterproof layer, the waterproof layer forms an annular protrusion and wraps around the pipe root.
4. Electrical box installation
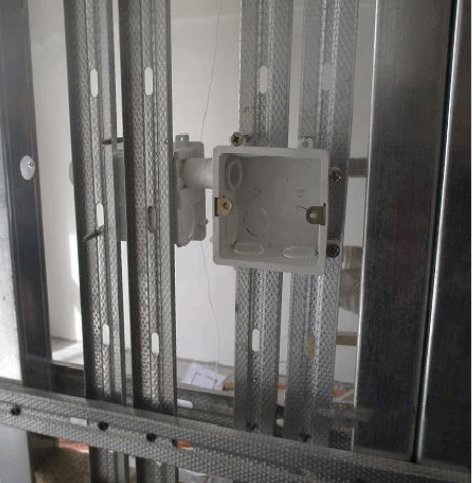
On-site photo of electrical box installation △
1. Install horizontal keels between two vertical keels spaced 400mm apart; fix the PVC junction boxes onto the horizontal keels, and secure the PVC pipes firmly with pipe clamps;
2. When installing the PVC junction boxes in the bathroom, keep them flush with the coated panel wall surface, and seal the edges with glass adhesive to prevent moisture from entering the coated panels;
3. Use PVC junction boxes to connect with the pre-embedded structural pipelines; when threading, fix the ground wire to the existing pre-embedded pipelines with crimp terminals, and protect the exposed wire ends with plastic-coated flexible conduits;
4. The electrical pipelines are connected to the indoor strong-current and weak-current distribution boxes.
Note: The electrical conduit uses a PVC20 pipe, and the junction box uses a PVC86 box
5. Water supply pipeline installation
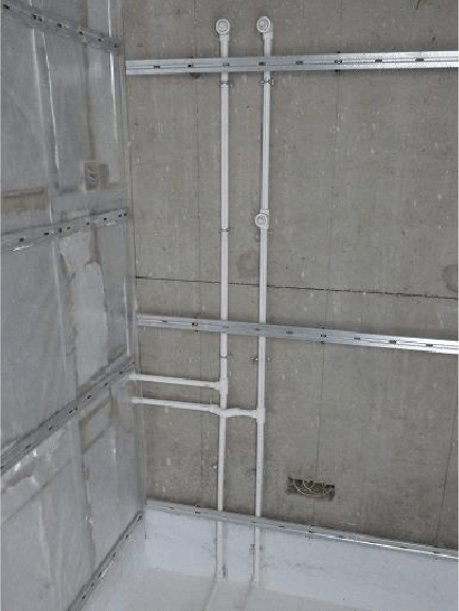
On-site photo of water supply pipeline installation △
1. Construction may proceed only after the partition wall keel frame and the bathroom waterproof coating are completed;
2. When installing the female-threaded elbows, make them protrude 5mm from the coated panel wall surface, and seal the edges with glass adhesive to prevent water from flowing into the coated panels in case of leakage;
3. The horizontal pipes are laid along the floor, running through the elevated floor layer, and are finally connected downstream of the water meter in the pipe shaft of the public area;
4. The pipes shall not pass through partition walls; when crossing other pipelines, bridging pipe fittings are used for connection.
Note: The water supply pipe uses a white PPR20 pipe, and the reclaimed water pipe uses a green PPR20 pipe
6. Rock wool and waterproof membrane installation
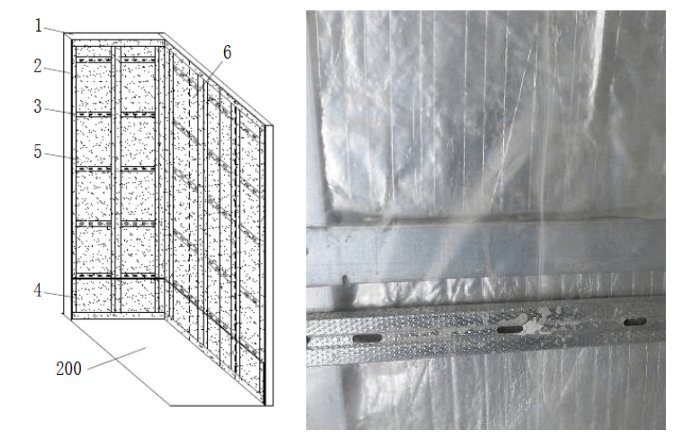
Schematic and on-site photos of rock wool and waterproof membrane installation △
1 Top and bottom keel 2 Vertical keel 3 Horizontal keel 4 Waterproof dam 5 Rock wool 6 Waterproof membrane 200 Waterproof layer
1. After the water and electrical pipelines are laid and firmly fixed, fill the partition wall with 50mm-thick rock wool;
2. After filling with rock wool, the partition wall on the bathroom side is covered with a waterproof membrane; the waterproof membrane shall be laid vertically with a lap width of 100mm. The bottom of the membrane connects to the waterproof layer to form an integral waterproof layer.
Note: The rock wool is a non-combustible fire-resistant material, and the waterproof membrane is a 0.1mm-thick PE film
7. Coated panel installation
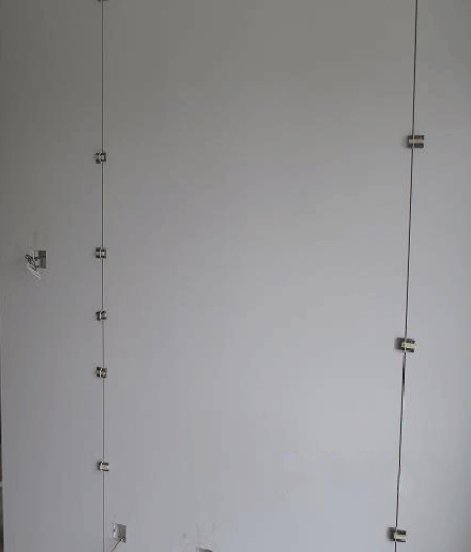
On-site photo of coated panel installation △
1. On the partition wall filled with rock wool, fix the horizontal keels on the other side; the installation height shall be kept level on both sides;
2. Bond the coated panels to the outer side of the horizontal keels with structural adhesive, leaving a 3mm gap between coated panels;
3. Affix installation position markers at the positions where the air conditioner and TV are to be installed.
Note: The coated panels are made of 8mm-thick calcium silicate board with a UV paint coating on the surface
8. Shower base installation
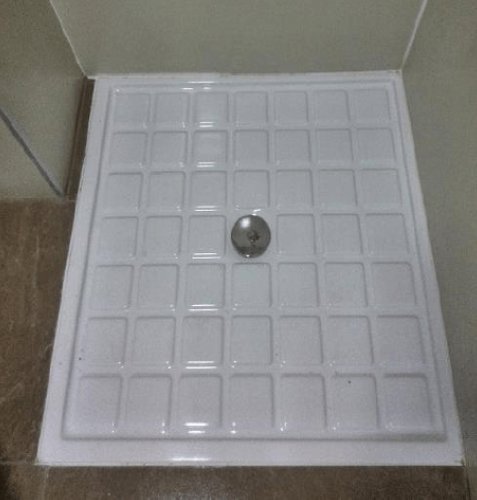
On-site photo of shower base installation △
1. The shower area uses an integral artificial stone shower base, which can truly achieve wet-dry separation in the bathroom, leaving no unsanitary dead corners; the walls and floor do not accumulate water or absorb moisture, staying dry and free of odors. Daily use and cleaning are very convenient, greatly enhancing the comfort and ease of maintenance of the bathroom;
2. A shower curtain is installed in the shower area, with a radius smaller than the size of the shower base, effectively preventing water from splashing out during showering.
9. Kitchen and bathroom ceiling installation
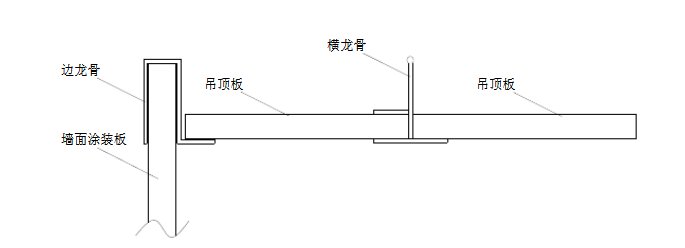
Schematic of kitchen and bathroom ceiling installation △
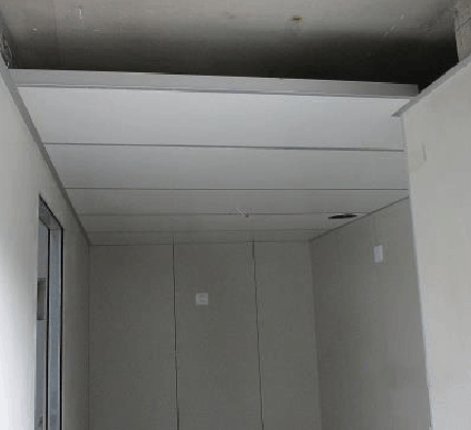
(Due to space limitations, for construction method items 10-15 - modular block heating floor method / wooden keel installation / floor heating module installation / baseboard component structure installation / floor heating pipe laying / floor coated panel installation - as well as Chapter VI, Characteristics of prefabricated interior fit-out projects, and Chapter VII, Comparison between prefabricated and traditional interior fit-out, please refer to the original article.)
END
The views expressed are the author's own Copyright © Zhuwei Architectural Technology
Reproduction without authorization is prohibited
Please credit the source when reposting: Zhuwei Architectural Technology
Zhuwei Architectural Technology is a new-type technical services company specializing in integrated design optimization, BIM consulting and prefabricated construction design consulting. Our team brings together senior engineers from leading design institutes, former executives of real-estate companies, BIM engineers and prefabrication engineers, delivering integrated design optimization, refined drawing review, BIM consulting with MEP detailing, and prefabricated design services.
Design optimization consulting: Positioned as an extension and complement to the design management of real-estate developers, we focus on consulting and optimization for civil buildings. Across the whole process — or at key stages required by the client — we control the economy, rationality and safety of the design, eliminating unnecessary cost while measurably improving drawing quality, achieving "lower cost, higher efficiency".
BIM consulting: Through digital construction technology we help designers reduce errors and improve quality in the design phase, help contractors save cost and plan high-quality MEP installation in the construction phase, and extend BIM models into facility management for the operation phase — in collaboration with mainstream software vendors.
Prefabricated design consulting: Whole-process design on BIM platforms, using Revit and Tekla for PC detailing. Component geometry and reinforcement are linked parametrically — what you see is what you get. We deliver Industry 4.0-ready drawings with cut-length data for every rebar, and IoT-enabled support for production, storage, transport and installation of PC components.
Our expert team comes from leading design institutes, with deep technical grounding and extensive experience in dual-track design and optimization; its technical capability and control are industry-leading.
—— This article is auto-synced from the WeChat Official Account “Zhuwei Architectural Technology”. Read the original ——